Alright, let’s be honest. Is your driveway sporting more oil stains than a mechanic’s shop? Does your patio feel slick with green algae, and does your house siding look like it’s wearing a coat of gray grime? If you’re nodding yes, you’re probably asking yourself, “What are the best pressure washing tips for driveways, patios, and siding to fix this myself?”
Great question. And you’ve come to the right place. Think of this as your go-to guide, written not like a textbook, but like a chat with a neighbor who’s done this a hundred times. We’re going to walk through nine straightforward steps that cut through the confusion.
The goal is to help you clean those surfaces without a single costly “oops.” So, grab a coffee, and let’s get your home’s curb appeal back, one simple tip at a time.
You wouldn’t use a sledgehammer to hang a picture, right? In the same way, pressure washing isn’t a one-size-fits-all blast of water. It’s a tool, and getting to know it is your first step to a job done right.
Think of your driveway, patio, and siding as different family members. Your concrete driveway is the tough, resilient one. Your wooden or composite patio is a bit more sensitive. And your house siding, whether vinyl or brick, is the most delicate of the three. They all need cleaning, but they each require a slightly different approach.
Why does this matter? Because the most common mistake isn’t under-cleaning, it’s over-powering. Knowing these basics now will make every single tip that follows make perfect sense.
Before you pull the trigger, let’s talk gear, because this is where most DIY dreams go sideways. Pressure washer tips aren’t just about technique; they begin with understanding your machine’s settings and that little screw-on nozzle. The numbers matter: PSI is your power (like how hard you scrub), and GPM is your flow (how much water helps rinse the dirt away). For siding, you’ll want lower PSI and a wider fan; for a driveway, you can bring in more power.
So, what’s the first move? Always match the nozzle to the surface. A green (25-degree) tip is your best all-around friend for patios and driveways. For siding, start with a white (40-degree) tip for a gentler touch. Getting this right from the start is the absolute foundation for everything else we’ll cover next.
Concrete is tough, but it’s not invincible. The key to learning how to pressure wash a driveway is combining the right pressure with smart movement. If you’re wondering, “What are the best tips for pressure washing driveway?” start using a stronger nozzle, but keep the wand tip about a foot away and use long, overlapping sweeps, as if you’re mowing the lawn. This prevents ugly circular etch marks.
Start at the top of the slope and work your way down so dirty water isn’t running over your clean work. And for those stubborn oil spots? Don’t just blast them. Let’s talk about pre-treating in a bit. Mastering this approach is what turns a messy job into a clean, uniform finish that looks professionally done.
Alright, so your patio looks like it’s been in a mossy wrestling match. Now, your first thought might be to hit it with the same power you’d use on the driveway, but hold up! Pressure washing your patio is a different game entirely; think of it more like washing a car than hosing down a sidewalk. You want to clean it, not accidentally strip or damage it.
So, if you’re doing patio cleaning with pressure washer, start by always sweeping off leaves and dirt first. Then, switch to that wider white nozzle we chatted about earlier, and whatever you do, keep the spray moving. Never let it linger in one spot. This gentle, consistent motion is exactly how you knock out that slippery algae without etching the stone or washing away the important sand between your pavers.
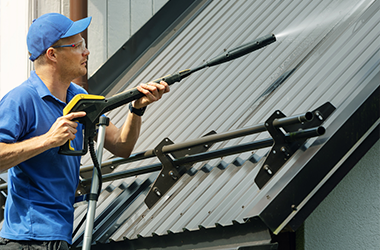
Let’s talk about your home’s siding, since this is where the most costly “oops” moments happen. People often ask, “What is the best tip for pressure washing siding?” and the answer is to go low and slow. Use the lowest effective pressure, often with that 40-degree white nozzle, and always spray at a downward angle. This cleans the surface without forcing a single drop of water up behind the panels, which is a one-way ticket to mold and rot.
Now, this leads perfectly into another big question: “What not to do when pressure washing siding?” Never use a ladder with a pressure washer in your hands (the kickback can be dangerous), and absolutely avoid using a turbo or zero-degree nozzle. It’s like using a scalpel for a job that needs a soft brush. Following these two rules alone will keep your siding intact.
Now, let’s talk about giving your surfaces a deep clean with detergent. This isn’t just about adding soap; it’s about a pattern of how you do things. Whether you’re tackling patio cleaning with a pressure washer or your home’s exterior, the rule is to apply soap moving up, and rinse with water moving down. Why? Applying from the bottom up prevents streaking, as the soap doesn’t immediately run down dry, dirty surfaces.
When it’s time to rinse, start from the top and work down. This washes all the soap and loosened grime downward and off the surface in a clean flow. It’s a simple flip in direction that makes a world of difference in getting a spotless, streak-free finish on your patio, driveway, or siding.
Here’s a simple truth that separates a good clean from a damaged surface: the wand should never be still. The moment you stop moving, you concentrate all that power on one tiny spot. This is arguably one of the best pressure washer tips you’ll get. Combine constant motion with the right distance, usually about the length of your foot to a foot and a half away from the surface, and you’ll avoid etching concrete, scarring wood, or stripping paint.
Think of it like painting a wall with a sprayer. You use smooth, steady strokes. The same goes for pressure washing siding, driveways, and patios. This rhythm ensures an even clean and is your best bet against leaving permanent marks.
You’re geared up and ready to go, but wait—did you sweep? This might sound too basic, but it’s a game-changer. Before you even think about turning on the machine, grab a broom. Sweeping away loose leaves, dirt, and grit from your driveway or patio isn’t just busywork; it’s the smartest prep you can do. This leaves only the stuck-on grime for the pressure washer to tackle, making your job faster and your results cleaner.
This step is especially important if you’re new to this. In fact, it’s one of the most important tips for pressure washing driveway and patio surfaces, because that layer of loose debris can easily get blasted around, scratch surfaces, and clog your equipment, which isn’t something you’d want to experience on a lazy weekend.
Okay, here’s the thing about hot water: unless you’ve got a machine called a “power washer” that’s built for it, just don’t. Stick to cold water. Your standard home pressure washer is designed for it, and it works perfectly for blasting away dirt, mud, and green gunk. It’s one less thing to worry about, which is perfect when you’re just figuring out how to pressure wash patio spaces and other areas.
Think of it this way: cold water is your simple, no-fuss friend. Hot water can be great for a greasy garage floor, but for cleaning your deck or siding, it’s overkill and can actually mess with your machine’s insides. Keeping it cool keeps your project smooth and headache-free.
Let’s end with the most honest tip of all. Sometimes, the smartest move is to make a quick phone call. If you’re staring up at three stories of siding, dealing with stains that won’t budge, or you’re just plain short on time, that’s your signal. This isn’t giving up; it’s being smart about protecting your home and your weekend.
Bringing in a team for professional pressure washing means you’re getting experience, the right commercial-grade equipment, and, most importantly, peace of mind. They handle the heavy lifting, the tricky angles, and the cleanup. Investing in a pro for the big or scary jobs saves you from the costly “oops” we’ve been avoiding this whole time, and lets you enjoy the results without the sore back.
Steering clear of these common errors will save you time, protect your surfaces, and guarantee a better result.
Using Excessive Pressure: This is mistake number one. Cranking the PSI too high doesn’t clean better, it damages concrete, splinters wood, and can force water behind your siding, leading to mold and rot.
Ignoring the Surroundings: That powerful spray doesn’t discriminate. Without proper precautions, you can accidentally strip paint from your trim, damage your landscaping, or even break a window. Always take a moment to move or cover anything fragile nearby.
Holding the Wand Too Close: It feels intuitive to get right up on a tough stain, but it’s a surefire way to leave permanent scars or grooves on the surface. Maintaining a safe distance (about 12-18 inches) lets the pressure do its job without causing harm.
Letting Detergent Dry On Surfaces: Applying a cleaning solution and then getting distracted can leave behind a filmy residue or cause streaking. Always follow the product’s instructions for “dwell time” and rinse thoroughly before the soap dries.
Skipping the Pre-Clean Sweep: Blasting away loose dirt, leaves, and debris with your pressure washer is incredibly inefficient. You’ll waste time and water. A quick sweep with a broom first makes the actual washing step faster and more effective.
So, you’ve made it through the guide. Pretty simple, right? You now know how to pick the right nozzle, the smart way to tackle each surface, and the little tricks that keep everything safe from damage. It all boils down to being gentle, patient, and letting the tool do the work.
Of course, if you look at your place and think, “You know, I’d rather just have this handled,” we get it. That’s exactly why we offer Professional Pressure Washing Services at Awning Cleaners. We take care of the stubborn stains and the tricky mold, so you don’t have to lift a finger or worry about a single “oops.” Ready to see your exterior shine? Just call us at (323) 273-3058 or swing by https://cleanmyawning.com/pressure-washing/ to set it up.
Use a 25-degree (green) nozzle, hold the wand a foot away, and use slow, overlapping sweeps. Always start at the top of a slope and work down.
Never use a high-pressure nozzle or spray upward. This forces water behind the siding, which can cause mold, rot, and serious damage.
Use a concrete-specific degreaser for oil stains or an all-purpose outdoor cleaner for general grime. Let it soak for 5-10 minutes before rinsing.
Sweep it first, then use a 40-degree (white) nozzle with moderate pressure. Keep the spray moving to avoid etching stone or pavers.